- Installation and Activation
After buying sticky mini cart, Goto https://codecanyon.net/downloads
and download the plugin by selecting All files & documentation.
Then unzip the file and find the folder named web install. You will find the installable zip file of the plugin inside this folder.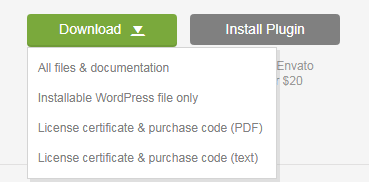

Installing Instructions
Via Default WordPress Plugin Uploader
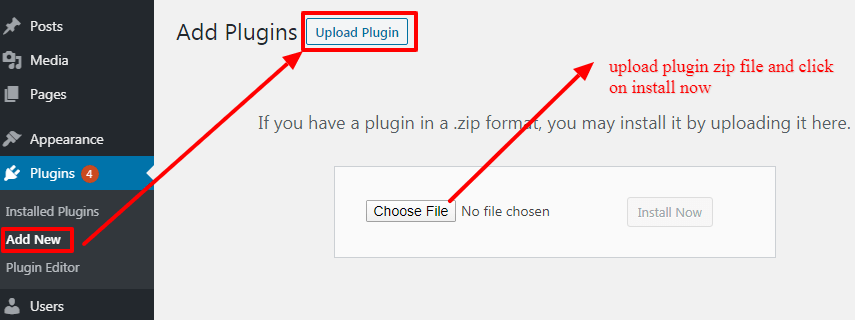
- 1. After download, Go to your WordPress admin panel
- 2. Goto Plugins> Add New. You will be redirected to the Add plugin page. Click on the Upload Plugin button.
- 3. Select the plugin zip file and install the plugin file.
- 4. Activate the plugin.
Via FTP
- 1. Unzip sticky-mini-cart.zip
- 2. Upload all the files to the /wp-content/plugins/sticky-mini-cart
- 3. Activate the plugin through the Sticky Mini Cart menu in WordPress.
- 4. For customizing the plugin’s settings, click on the Sticky Mini Cart menu in Wordpress left admin menu.
Once the plugin is installed and activated you will find a menu named Sticky Mini Cart in the left menu bar of the admin menu. Once you click on that menu, you will go to the Plugin’s Settings Page.
- Requirements
The following are required for plugin
- 1.WordPress 4+
- 2.WooCommerce, make sure you have installed and activated the Woocommerce plugin.
Since it is an add-on of Woocommerce so WooCommerce needs to be installed and activated.
- Creating Mini Cart
Once the plugin is activated you will find a menu named Sticky Mini Cart in the left menu bar of the admin menu. Once you click on that menu, you will go to the plugin’s Settings page.
This is the setting configuration page for the plugin. From here you can set up a mini-cart. It contains Sticky Cart Settings, Layout Settings, Product Settings, General Settings, Shortcode Generator and you can manage the overall settings from here.
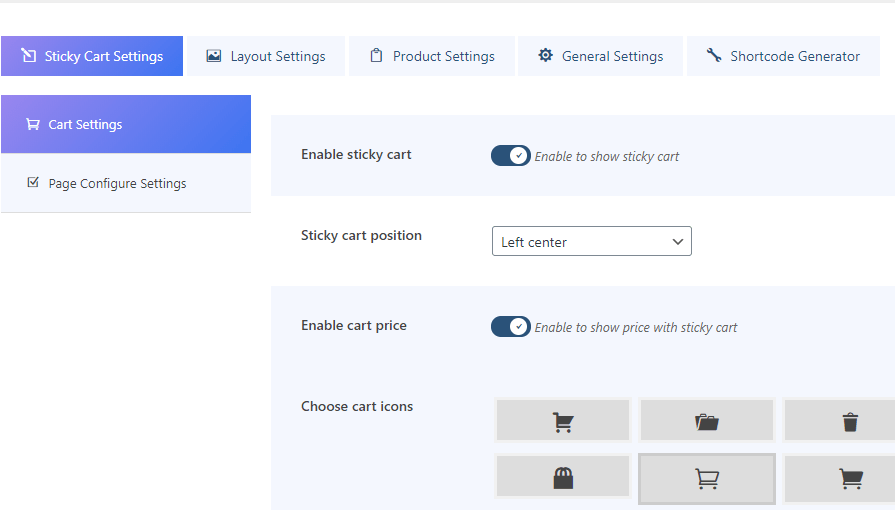
- Sticky Cart Settings
From this section, you can setup settings to display the sticky mini cart in the frontend. This section is divided into two parts. Cart Settings and Page Configure Settings.
Below are the detailed descriptions for cart settings.Cart Settings
To show the sticky cart in frontend follow the following fields:
- Enable sticky cart: Enable this floating cart to show the sticky cart on any page/product.
- Sticky cart position: Choose the position to show the sticky cart on the site. It contains 6 different positions. They are left center, top left, bottom left, right center, top right, bottom right.
- Enable cart price: Enable this to show the total price of the cart with a floating cart icon.
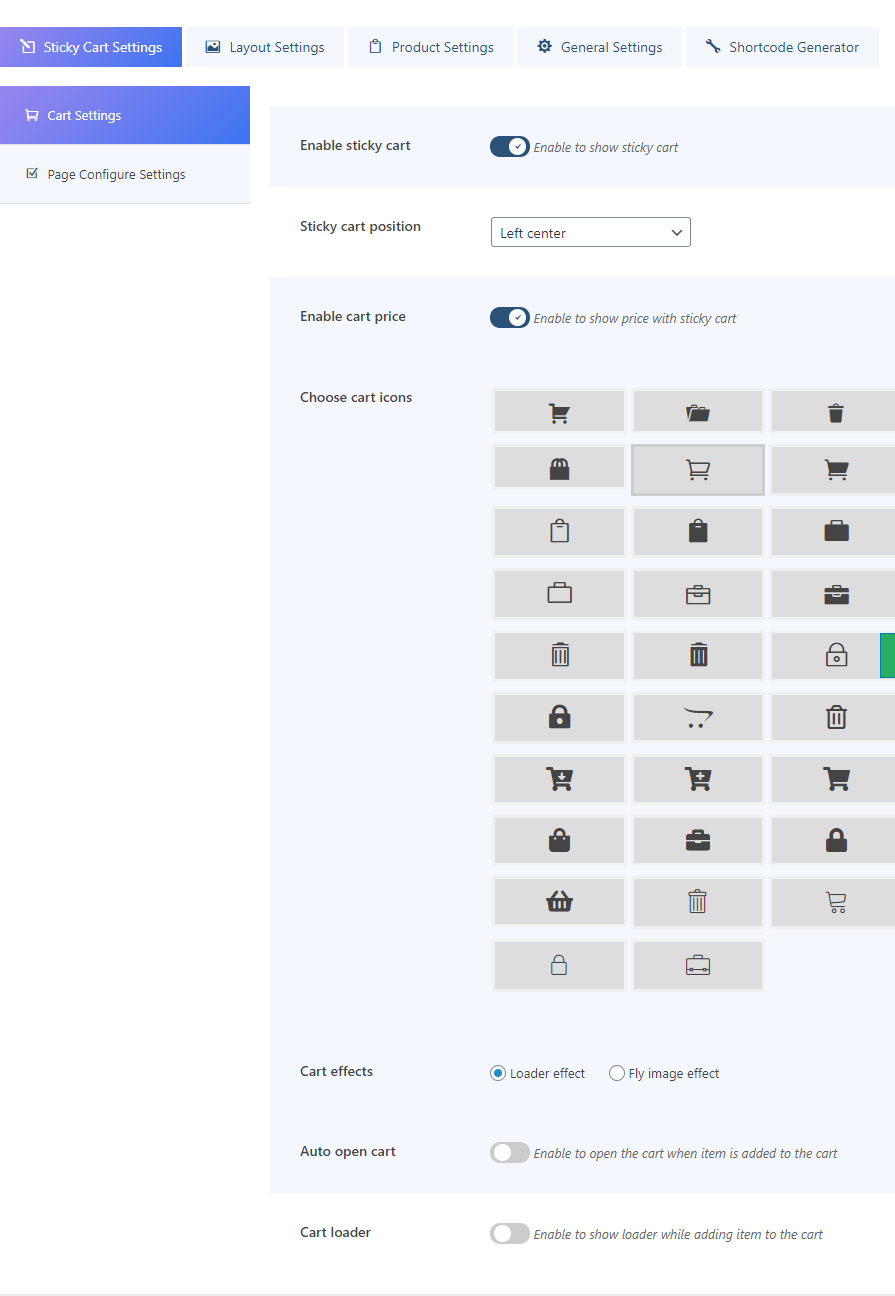
- Choose cart icon: Choose your required cart icon from here.
- Cart effects: This is of two types of effects: loader effects and fly image effect. After adding the product in the cart, it will be added to the cart by either loader effect or fly image effect. The loader effect will show the loader for a few seconds. The fly image effect will make the image fly to the cart.
- Auto open cart: If you will select loader effect in cart effects settings then this setting will appear. You can enable this to open the cart automatically when each item is added to the cart.
- Cart Loader: Enable this to show the loader on adding the product to the cart. You can choose any one of the listed loaders over here.
Page configure settings
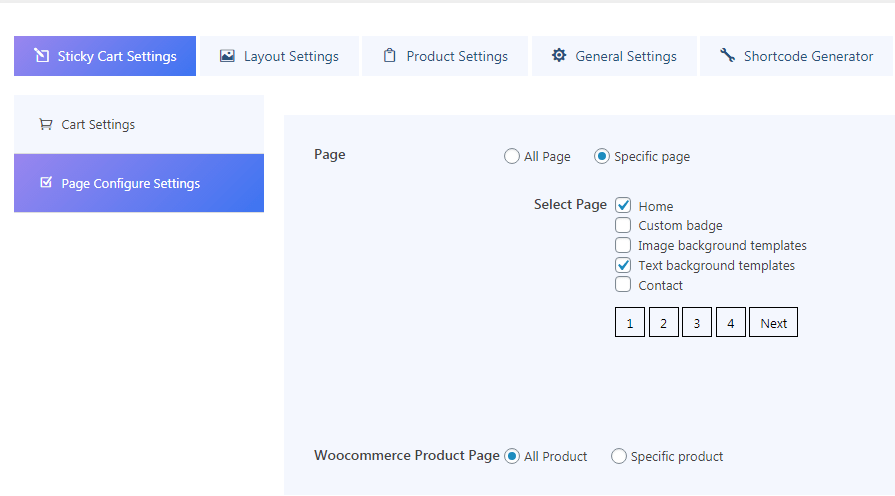
This setting is used to show the sticky cart on all pages, product pages or specific products or pages. It contains product and page settings.
- Page:
You can select either all pages or check any specific multiple pages to show the sticky cart in respective pages. - WooCommerce product page:
You can select either all product pages or check any specific multiple product pages to show the sticky cart in respective product pages.
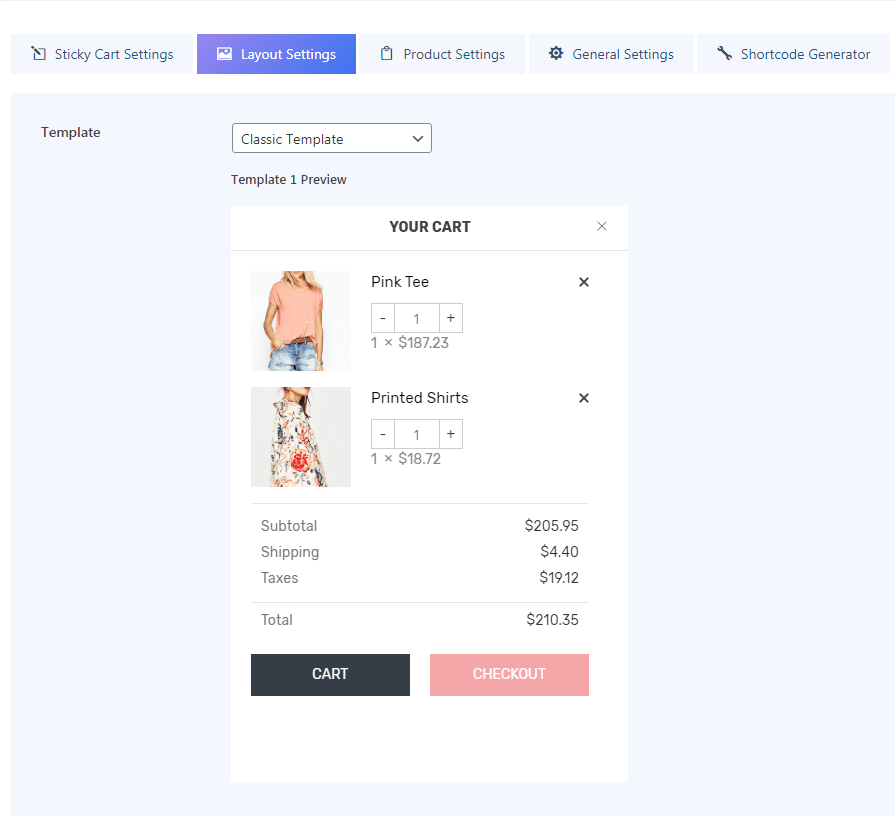
- Layout Settings
This is used to set up the layout template of the cart. It includes the following fields.
Template: Choose the required template from this setting. It has 10 different templates.
- Product Settings
This is used to set up the details of the product inside the cart. It includes the following settings.
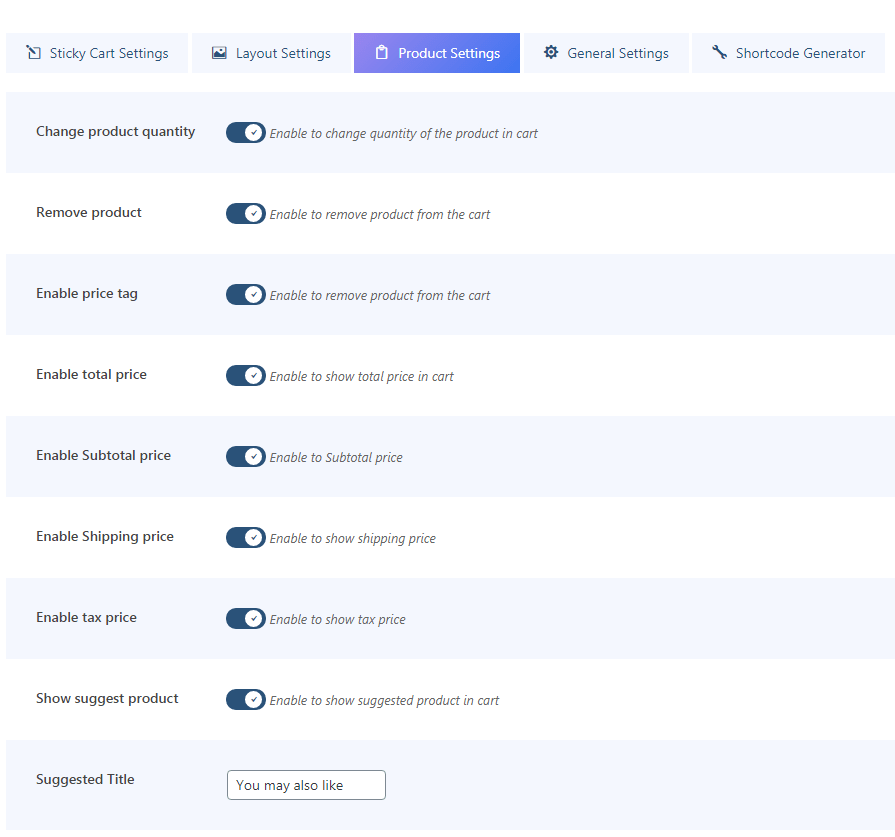
- Change product quantity: This is used to enable the product quantity block in the cart to increase or decrease the product quantity in the cart.
- Remove product: This is used to enable or disable the cross delete icon on the cart to remove the product from the cart.
- Enable price tag: This is used to enable or disable the product price tag in the cart.
- Enable total price: This is used to enable or disable the product’s total price tag in the cart.
- Enable subtotal price: This is used to enable or disable the product subtotal price tag in the cart.
- Enable shipping price: This is used to enable or disable the product shipping price tag in the cart.
- Enable tax price: This is used to enable or disable the product tax price tag in the cart.
- Show suggest product: This is used to show the suggested cross-sell products in the cart.
- Suggested title: This is used to set up the title for suggested cross-sell products to display in the cart.
- General Settings
This is used to set up the general settings for the product.

- Title text in cart: This is used to enter the title text to show in the cart.
- Enable checkout button: This is used to enable the checkout button in the cart.
- Checkout text: This is used to enter the checkout text for the checkout button.
- Enable shopping button: This is used to enable the shopping button to show the continue shopping button if the cart is empty.
- Continue button text: This is used to enter the continue shopping button text for the above button.
- Continue button URL: This is used to enter the continue button URL for the continue shopping button.
- Enable popup on the cart: This is used to enable to show popup on the product image to show product details.
- Choose loader: This is used to select the loader to show on the cart when the product quantity is increased, decreased or deleted.
- Shortcode Settings
This is used to get the shortcode for the sticky mini cart. To generate the shortcode, enable or select the required settings on cart settings and layout settings as described above in sticky mini cart settings and then click on click me to generate the shortcode.
Copy and paste the shortcode to the required page where you want to show the sticky mini cart.
If you want to have different designs of the mini-cart on different product pages then you can use the shortcode to that specific page.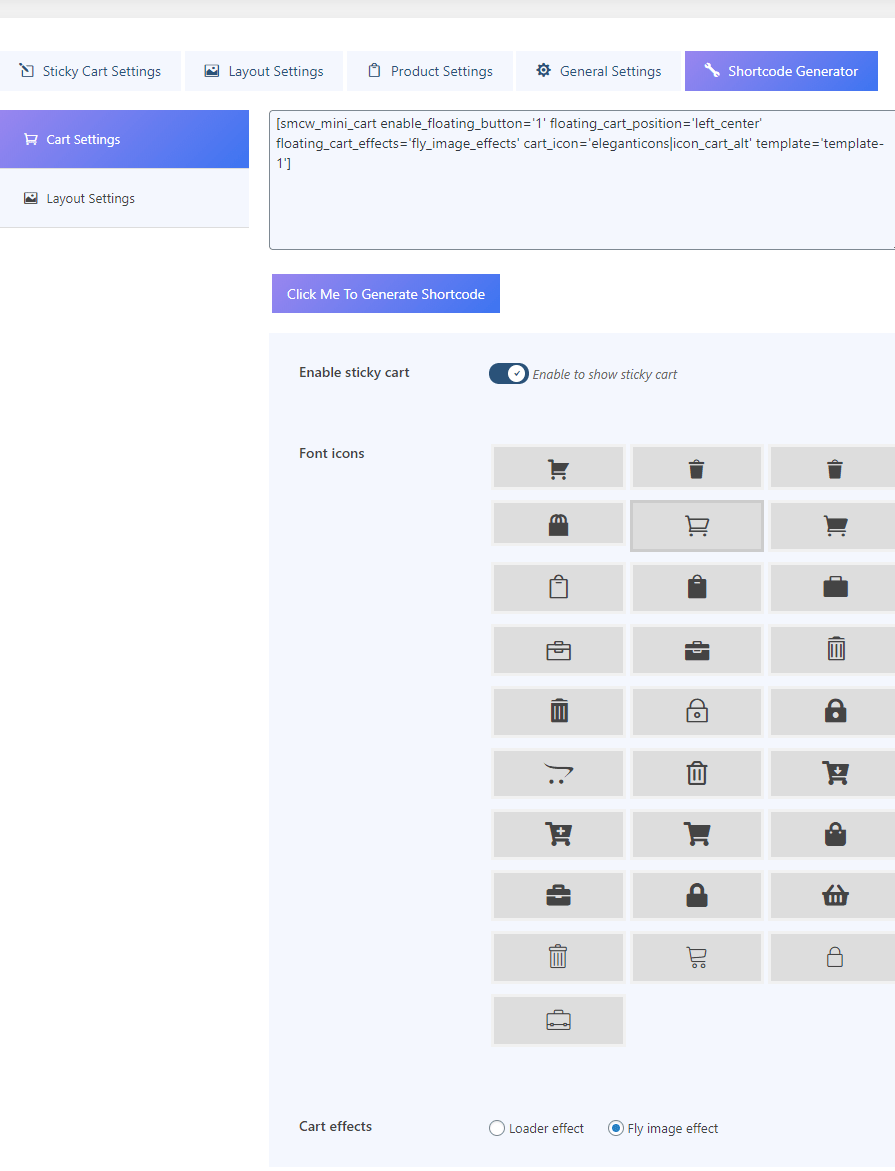
After buying sticky mini cart, Goto https://codecanyon.net/downloads
and download the plugin by selecting All files & documentation.
Then unzip the file and find the folder named web install. You will find the installable zip file of the plugin inside this folder.
Installing Instructions
Via Default WordPress Plugin Uploader
- 1. After download, Go to your WordPress admin panel
- 2. Goto Plugins> Add New. You will be redirected to the Add plugin page. Click on the Upload Plugin button.
- 3. Select the plugin zip file and install the plugin file.
- 4. Activate the plugin.
Via FTP
- 1. Unzip sticky-mini-cart.zip
- 2. Upload all the files to the /wp-content/plugins/sticky-mini-cart
- 3. Activate the plugin through the Sticky Mini Cart menu in WordPress.
- 4. For customizing the plugin’s settings, click on the Sticky Mini Cart menu in Wordpress left admin menu.
Once the plugin is installed and activated you will find a menu named Sticky Mini Cart in the left menu bar of the admin menu. Once you click on that menu, you will go to the Plugin’s Settings Page.
The following are required for plugin
- 1.WordPress 4+
- 2.WooCommerce, make sure you have installed and activated the Woocommerce plugin.
Since it is an add-on of Woocommerce so WooCommerce needs to be installed and activated.
Once the plugin is activated you will find a menu named Sticky Mini Cart in the left menu bar of the admin menu. Once you click on that menu, you will go to the plugin’s Settings page.
This is the setting configuration page for the plugin. From here you can set up a mini-cart. It contains Sticky Cart Settings, Layout Settings, Product Settings, General Settings, Shortcode Generator and you can manage the overall settings from here.
From this section, you can setup settings to display the sticky mini cart in the frontend. This section is divided into two parts. Cart Settings and Page Configure Settings.
Below are the detailed descriptions for cart settings.
Cart Settings
To show the sticky cart in frontend follow the following fields:
- Enable sticky cart: Enable this floating cart to show the sticky cart on any page/product.
- Sticky cart position: Choose the position to show the sticky cart on the site. It contains 6 different positions. They are left center, top left, bottom left, right center, top right, bottom right.
- Enable cart price: Enable this to show the total price of the cart with a floating cart icon.
- Choose cart icon: Choose your required cart icon from here.
- Cart effects: This is of two types of effects: loader effects and fly image effect. After adding the product in the cart, it will be added to the cart by either loader effect or fly image effect. The loader effect will show the loader for a few seconds. The fly image effect will make the image fly to the cart.
- Auto open cart: If you will select loader effect in cart effects settings then this setting will appear. You can enable this to open the cart automatically when each item is added to the cart.
- Cart Loader: Enable this to show the loader on adding the product to the cart. You can choose any one of the listed loaders over here.
Page configure settings
This setting is used to show the sticky cart on all pages, product pages or specific products or pages. It contains product and page settings.
- Page:
You can select either all pages or check any specific multiple pages to show the sticky cart in respective pages. - WooCommerce product page:
You can select either all product pages or check any specific multiple product pages to show the sticky cart in respective product pages.
This is used to set up the layout template of the cart. It includes the following fields.
Template: Choose the required template from this setting. It has 10 different templates.
This is used to set up the details of the product inside the cart. It includes the following settings.
- Change product quantity: This is used to enable the product quantity block in the cart to increase or decrease the product quantity in the cart.
- Remove product: This is used to enable or disable the cross delete icon on the cart to remove the product from the cart.
- Enable price tag: This is used to enable or disable the product price tag in the cart.
- Enable total price: This is used to enable or disable the product’s total price tag in the cart.
- Enable subtotal price: This is used to enable or disable the product subtotal price tag in the cart.
- Enable shipping price: This is used to enable or disable the product shipping price tag in the cart.
- Enable tax price: This is used to enable or disable the product tax price tag in the cart.
- Show suggest product: This is used to show the suggested cross-sell products in the cart.
- Suggested title: This is used to set up the title for suggested cross-sell products to display in the cart.
This is used to set up the general settings for the product.
- Title text in cart: This is used to enter the title text to show in the cart.
- Enable checkout button: This is used to enable the checkout button in the cart.
- Checkout text: This is used to enter the checkout text for the checkout button.
- Enable shopping button: This is used to enable the shopping button to show the continue shopping button if the cart is empty.
- Continue button text: This is used to enter the continue shopping button text for the above button.
- Continue button URL: This is used to enter the continue button URL for the continue shopping button.
- Enable popup on the cart: This is used to enable to show popup on the product image to show product details.
- Choose loader: This is used to select the loader to show on the cart when the product quantity is increased, decreased or deleted.
This is used to get the shortcode for the sticky mini cart. To generate the shortcode, enable or select the required settings on cart settings and layout settings as described above in sticky mini cart settings and then click on click me to generate the shortcode.
Copy and paste the shortcode to the required page where you want to show the sticky mini cart.
If you want to have different designs of the mini-cart on different product pages then you can use the shortcode to that specific page.